Saturday, March 13, 2010

Vivian's Crock Pot Macaroni & Cheese


This is the MAC DADDY of MAC n CHEESE!

Macaroni and cheese kicked butt in the latest poll and won by a landslide! And it's about time, I have been waiting to make this great recipe!

This recipe is an adaptation of a great recipe from Royall's grandmother, Vivian. It's pretty simple and you can leave it cooking in the crock pot while you are at work... or sitting on the couch all day watching PBS. Either way, you can set it and forget it!

Vivian's Crock Pot Macaroni & Cheese takes anywhere from 4 1/2 to 6 1/2 hours to make, but again, it's not like you are slaving over the stove for those hours. It's more like 15 minutes of prep and a few hours of forgetting about it while it is in the slow cooker. Or if you are like me, you won't forget about it because you are too excited and will go check on it every 5 minutes!

You're gonna need:

1/2 box elbow macaroni, cooked and drained, I used organic whole wheat macaroni because I like to pretend to be a food snob sometimes. In hindsight, I think regular pasta would have tasted better.

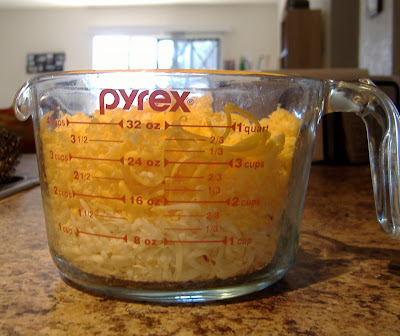
4 cups of shredded cheese, If you buy bags of already shredded cheese you'll need 2 bags. I shredded my own and used 1/2 monterrey jack (the kind with jalapenos) and 1/2 cheddar cheese. The original recipe calls for all cheddar.

12 oz. evaporated milk, I used 2 %, and only because Royall wouldn't let me buy the fat free one. I just couldn't justify using full fat milk. Trust me, there's enough fat in the cheese.

1 1/2 cups milk

2 eggs

1 tablespoon salt
(I know it seems like a lot of salt, but any attempt to make this healthy will be in vain. This recipe bakes carbohydrates and fat into a large cake, there's no turning back now.) PS: Royall actually added salt to his!

HOW TO MAKE AWESOME CROCK POT MAC N CHEESE:

1. Cook macaroni and drain.


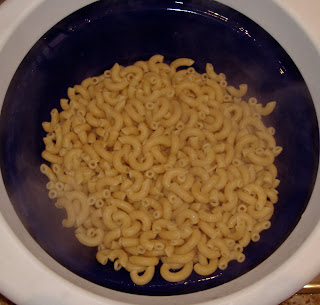
2. Grease your crock pot. I used a large oval crock pot, but I think this recipe is supposed to be done in the smaller kind that is round shaped.

3. Shred the cheese and measure it. If you took the easy way out, open the bag of pre-measured cheese.


4. In a big old bowl add everything; the macaroni, shredded cheese (save some to sprinkle on top), milk, evaporated milk, eggs and salt.

4. Add to crock pot and cook on low for about 6 hours. This time is according to the original recipe. I think since I used a larger crock pot, it cooked faster. It was done in about 4 1/2 hours.

Here's the progression of goodness:

Stage one: just mixed, "not-so-good"


Stage two: an hour into cooking time, "gettin good"


Stage 3: done, Geee-Double-Oh-Dee: Good!


By the way, like most things made in the crock pot, you aren't supposed to take the lid off to look at it because you lose a lot of steam pressure and heat. I wanted to take pictures so I peeked a few times, but don't try this at home folks!


Yummy! Since I used two kinds of cheese, some bites had a little kick to 'em because of the spicy monterrey jack with jalapenos. I probably wouldn't go for the whole wheat pasta next time, but it was still quite tasty. ENJOY!

Thursday, March 11, 2010

Cake-inna-Mug

Adventures of Cake-inna-Mug

What's better than chocolate cake? Why, chocolate cake that you make in a mug in the microwave in 3 MINUTES, of course!

Royall's grandmother introduced us to cake in a mug and gave us a recipe which I lost somewhere. Her recipe used chocolate chips instead of cocoa powder and was so rich that we couldn't eat a whole mug in one sitting! This is the recipe I used, which is similar.

Disclaimer: This isn't going to taste like a cake that you labor over and cook the old fashioned way. But it's darn good for something made in a microwave and it satisfies a chocolate craving after a long day. I never had an easy bake oven, but I hypothesize that it might yield something like this. It's rich and dense. Hope you have some milk handy!

You're going to need 5 minutes, your favorite mug and:

4 tablespoons flour (cake flour is best)
2 tablespoons cocoa powder
4 tablespoons sugar
3 tablespoons milk
3 tablespoons oil
1 egg

Mix all the ingredients in your favorite mug. Mix it again and again. You don't want scrambled eggs cooked in your mug or flour stuck on the bottom. Speaking of eggs, check this out: double yolks ?! Does that mean fraternal twin chickies? FYI: I researched this and it turns out that double yolk eggs usually never hatch because the two baby chicks fight each other to the death before they even hatch. Not appetizing, I know, sorry. Let's move on...


After everything is mixed well, put in the microwave on high for 3 minutes. DON'T FREAK OUT: the cake will rise up and look like it is about to overflow. Just let it finish in the microwave... it's kinda cool to watch! It will go down after it cools a little bit.


Add some cool whip if you'd like and eat up!


Tuesday, March 9, 2010

Veggie Beef Soup


Veggie Beef Soup:

Work some left-over magic by using pot-roast beef and simple ingredients to make this tasty soup.

My husband and I were getting tired of eating sunday's pot roast everyday! So, I figured I needed to do something new with the left overs I had sitting in the fridge... or else it would end up in the trash or in the fridge making a fuzzy smelly microbiology experiment while we forgot it was ever in there.


This soup took about 30 minutes to make.


You'll need:

shredded left over pot roast or something similar (including juices)

stock (I used 2 cartons of chicken stock and 1/2 a carton of leftover beef stock from the pot roast recipe)

can of diced tomatoes

bag of frozen vegetables (the old school kind with corn, peas, green beans, carrots and limas)

potato, cubed

1/2 pound bag of pasta (technically, "pastini", the little baby kind you get in diner soups, like orzo)


There's only 4 steps, and one of 'em is EATING:

1. Throw everything into a big soup pot.

2. Here's the slightly interesting part. I took about 1 1/2 to 2 cups of the junk in the bottom of my cast iron dutch oven and put it in a food processor for a minute. This included juices, big chunks of herbs, mushrooms and carrots that were in the pot roast. Add to the big soup pot for a flavor boost.

3. Simmer everything together for 20-30 minutes.

4. EAT!


PS: Oh, the irony!!! I was trying to get rid of leftovers. This recipe made so much, I ran out of storage containers and had to use plastic baggies. FYI: Putting soup into plastic baggies is NOT an easy task.


Also, please take note of how clean my fridge is. Thank you.

Sunday, March 7, 2010

Dutch Oven Pot Roast

Inspired by Pioneer Woman and a buy-one-get-one-free sale on roasts, Royall and I set out to make a pot roast today. Any excuse to pull out the cast iron dutch oven is welcomed around here. Especially on a cold and rainy day like today. I've never made a pot roast before because it seemed too intimidating. It was pretty easy (Royall did most of the work!) and it made a great one-pot meal that was tasty and hearty.

You'll need 3 1/2 to 4 hours and the following ingredients:

3-4 ish pound chuck roast
1 cup of red wine
about 2 cups of beef broth
6 carrots
2 onions
button mushrooms (don't make no nevermind how many)
a few potatoes if you'd like
rosemary and thyme

1. Make sure the roast is room temperature (at least let it sit out 30 minutes to an hour). Don't pull it right out of the fridge and begin heating it because it won't cook evenly.

(This is the free one, already frozen. The one we made was already cooking when I realized I forgot to nab a nice "before" picture. You get an honorable mention and self-satisfaction if you find what's wrong on the label.)

2. Cut onion and carrot into thick pieces.

3. Saute onion for a few minutes. Remove from pan and set aside.

4. Saute carrot for a few minutes. Remove from pan and set aside.

5. Rub on salt and pepper to season the roast.

6. Brown the roast in the dutch oven. Remove from pan and set aside.

7. De-glaze the dutch oven by adding a cup of red wine. Scrape all the meaty gunk off the bottom and whisk it into the wine. That's where the flavor is!

8. Place the roast back in the dutch oven.

9. Add broth until it covers about half of the roast.

10. Throw all the vegetables back in the dutch oven.

11. Add herbs. A few sprigs of rosemary and thyme will do the trick.

12. Place lid on dutch oven and cook for 3 hours at 275 degrees. Since this cooks at such a low temp, I bet you could make it in a crock pot too. It takes away from the rustic beef cowboy thing that the cast iron brings to the table, though.

Here's the before and after:


The cast iron makes the picture look a little gray and murky, but trust me, this was goooood. Made the apartment smell like rosemary too!


Here it is on my favorite plate:


Saturday, March 6, 2010

The WASPs have spoken, and They Want Broccoli Rice Casserole!

Last week's poll results are in and broccoli rice casserole won!

I'm excited that I got to make broccoli rice casserole this weekend for two reasons:

1. Every time I've made this, it has come out wrong. Once, I accidentally doubled the margarine and there was grease pooled on top! Second time I made it, I dumped frozen broccoli right in without cooking it first and it was really soupy from too much water. I really wanted to get it right this time!

2. This is the stuff family legends are made of. I was speaking to my Mom about the poll before it was over and she told me, "Let me know if broccoli rice casserole wins, I'll tell you the story behind it. It's 25 years old." I never knew there was such a heritage behind this cheesy concoction! It's older than me, apparently.

Here's what Mom had to say:

"Every summer a parent at the nursery school, Mrs. Kasper, treated the staff to lunch. One year she made this delicious casserole. She had seen it on a box of rice and it was her first time making it. That was about 25 years ago...the recipe has been a family and pot luck dinner staple, it has undergone many changes and variations, but it is still a crowd pleaser. Fondly, the family named it after her."

I don't ever remember our family naming it after her, but let's give credit where credit is due! From here on out, broccoli rice casserole shall be called Mrs. Kasper's Broccoli Rice Casserole, or perhaps Kasper Kasserole!

Kasper Kasserole takes about an hour to make.

You will need:

1 cup of uncooked rice (the instant quick cooking kind like Success or Minute Rice, I used brown rice so I can pretend that I am being healthy)

package of frozen broccoli (I used fresh because I just happened to have some in the fridge)

can of cream-of-your-choice soup (I used cream of chicken with herbs)

1/2 cup Cheez Whiz

small onion

1/2 stick margarine (1/4 cup)

1/4 cup milk

1/8 cup water

PS: I remember my Mom making this with diced ham in it when I was a kid, so you could add that too if you need to use up some leftovers.


The instructions are SO simple and easy, I really don't know how I've messed this up so many times:

1. Preheat the oven to 350 and grease a square 8x8 pan.

2. If using frozen broccoli, cook according to package directions. Make sure you drain well or pat dry so it doesn't make the casserole too liquid-y. For fresh broccoli, just rinse it well and cut into small florets.

3. Saute onion until tender.

4. Mix all the ingredients together in a bowl and add to greased pan.

5. Bake for 45 minutes until the casserole bubbles and browns a little on top.

This stuff is sooooo good! Mine tasted different than what Mom used to make though. I doubt she really followed that recipe every time (good cooks don't need recipes). I don't remember her putting onions in it either, because I surely would have had a fit (I hated onions to an extreme until a few years ago). This recipe could be easily adapted, too. I bet it would be good with other types of veggies in it, chicken, or even with a little cayenne added for some heat.


YUM! Royall says, "Que rico!".

Wednesday, March 3, 2010

Purple Pickled Eggs

I don't know if pickled eggs count as WASP-y food, but I just had to blog about these bad boys:


I don't know what on earth possessed me to make pickled eggs, but I got to thinking about them a few days ago and figured I'd give it a whirl. My reasoning being: I like pickles, I like hard boiled eggs, maybe I'd like pickled hard boiled eggs. Also, I wanted to make my own so I knew exactly what I was getting myself into.

To make purple pickled eggs you'll need a couple days and:

4-6 hard boiled eggs
1/2 cup vinegar
2 tablespoons brown sugar
1/2 teaspoon pickling spice
1 cup water
a few beet slices

1. Hard boil eggs and cool them in the fridge. Peel.

2. In a saucepan, bring water, vinegar, sugar, pickling spice, and beets to a boil. Check out the taste. I added a little extra sugar to mine. Cool in the fridge.

3. Important: Don't place eggs in pickling solution until both the eggs and the pickling solution have been chilled. Otherwise, the eggs may get a rubbery texture.

4. Let eggs sit in picking solution for 2 days.

5. Be brave and try one! Aren't they strangely pretty?


I have to say that I was pleasantly surprised with how these came out! It tasted like a hard boiled egg married a pickled beet and had a beet-egg baby. However, I could see how these might be a hard-to-acquire taste for the less adventurous.

Monday, March 1, 2010

Cheap-Ass Chicken

Welcome to Cheap-Ass Chicken:

A yummy roast chicken dinner complete with potatoes and lemon-almond broccoli for four people for under $2.50 per person! What an incredible deal! But wait, there's more! This meal includes WINE!!!

Here's the breakdown:

wine: $2.97 (it was a "rollback" from Walmart, doesn't get more cheap-ass than that).
chicken: $4.44
broccoli: $0.69
almonds: $1.88

Divided by four servings, it comes out to be $ 2.4952 per person. You need more ingredients for this recipe, but if I had them on hand in my pantry, you probably will too.

If you have never roasted a chicken, you are truly missing out. It is super easy and always comes out tasting great. It's also impressive if you have company and it fills your home with awesome herb-y aroma. Plus, it is cheaper than buying a rotisserie chicken. It's probably even cheaper than some gross fried junk from KFC or Popeye's!

For the chicken you will need a few hours and:

a roasting pan
chicken
herbs (I used fresh rosemary, thyme and basil)
lemon pepper seasoning
olive oil
salt and pepper
potatoes to roast in the bottom of the pan if you want

For the lemon-almond broccoli you will need a few minutes and:

a head of broccoli
onion
lemon juice
almonds (slivered)
olive oil
sesame seeds
dried minced garlic

CHICKEN INSTRUCTIONS:

1. First things first: Preheat the oven to 325 and tap into that cheap bottle of wine. You will soon need it when it comes time to clean the raw chicken. No, I don't have a proper wine glass. This is cheap-ass, remember?

2. Clean the chicken. It's not fun, but not as bad as you might imagine if you've never done it before. Just put it in the sink and run cold water through the cavity.

Optional: Flap the poor bird's wings while singing that annoying chicken dance song and have some fun.

If you bought a chicken that still has some innards in it, you're unlucky. You will need to get rid of those things. On the bright side, you could cook that stuff and your dog would probably love it.

3. Place the chicken on the rack in a roasting pan and dry the skin off. Don't skip this part, this is important because it helps the skin get crispy and brown!

4. In a small bowl, pour a few tablespoons of olive oil, a splash of lemon juice, and add whatever herbs you'd like. I used basil, rosemary and thyme.

5. It gets a little gross again. You need to get the seasonings under the skin where the white meat can soak up some herb-y goodness. Gently but confidently get your fingers under the skin and separate the skin from the meat by breaking the clear thin subcutaneous membrane. Spread some of the oil/herb mixture between the skin and meat.

6. Coat the outside of the chicken with the same mixture of oil and herbs. I also sprinkled salt, pepper, and lemon pepper seasoning on the chicken I made.


7. If you have a great probe thermometer that your mother got for your husband last Christmas, now's the time to use it.

8. Roast for a few hours. Since I used a probe thermometer, I just checked every 20 minutes or so to make sure the chicken skin wasn't getting too brown (if it does get too brown, make a foil tent and place over the chicken). The thermometer alerted me when it had gotten hot enough, about 180 degrees. I think it took about 2 hours to reach this temperature.


9. Remove from oven and let rest while you make the broccoli.

BROCCOLI INSTRUCTIONS:

1. Make sure the broccoli has been cleaned. Cut into florets. Slice up half an onion, too.

2. Get a large pan hot, really hot, and add some olive oil and dried minced garlic (just a sprinkle).

3. Add broccoli and onions and saute briskly.

4. Add a few teaspoons of lemon juice, a dash of stir fry sauce, almonds (1/4 cup-ish), and some sesame seeds.


5. This doesn't need to cook very long. Maybe 3 or 4 minutes total.

6. Plate it so it looks pretty and impressive.


Eat your cheap-ass masterpiece!